For the games style to develop and for me to begin working on the 3D models for the environment my first task was to design the foundations of the world, the terrain. I decided the quickest way to build up the terrain would be to use the built-in terrain editor which ships with Unity 4. The main advantages of using this from the start is that the Level Of Detail component is built in to the system, which means I'd only have to make one high poly-version of the terrain which would then scale dependent on distance (poly count and texture mip-maps).
These screenshots show the initial map that also uses a splat map to combine multiple high-resolution textures through smooth gradients. I tweaked the layout of the map multiple times before settling with this slightly off-centre layout, I feel this would be more aesthetically exciting. These were the first screenshots I took so unfortunately they include a variety of assets created later in the process.
It also shows how I am integrating assets in to the terrain such as the cliff sizes which help break up the 'smoothness' of the organic terrain in comparison to the harsh rock like edges of the cliffs.
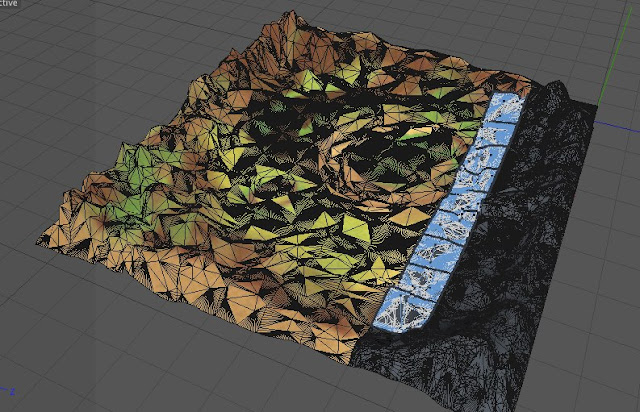
The above image is a wireframe representation the benefits of using the in-built terrain editor inside Unity, you can clearly see the simplification of the mesh in the distance, and the subdivided surface in the foreground. The above settings are using the least processor intensive settings (200 pixel error margin and 2000 units LOD distance)
It also This is a rocky section of the environment which will be where the ore resource of the world is found, the environment represents this from close up and far away due to the rough outcrops which is not seen in the rest of the world.
After tweaking the level as much as I could, and testing with just the environment within the render region of the game it became apparent that the mesh divisions would cause issues on a tablet device and would really push the mobile devices even without any other assets in the world. At the time it was pushing 60K verts (120k Tris) which is far over a reasonable setting for the end-game; I am aiming for the entire scene (including assets) to cap at 35k/40k tris, meaning wherever the player is within the world the frame rate will not drop.
\As you can see with the progress of the design of the level it was just going to be a complete no-go to be using the terrain as it was for the tablet devices. After searching the internet I found a plug-in for Unity which would export the terrain object as a .OBJ file which meant I wouldn't have to remake the environment in Cinema 4D from scratch. All of my current asset placement was therefore not wasted, and I could continue on with the layout in Unity without worrying about replacing the mesh with a different aligned new landscape mesh.
After importing the terrain in to Cinema 4D I then modified the UV maps of the terrain as a whole before I sliced it up in to LODable slices (UV mapping in Cinema 4D is done per object as opposed to multi-object selection). I originally divided the landscape in to an 11 x 11 grid (55 tiles) and then exported the group selection to ZBrush.
Below is an example of the UV Decimation Tool being used on an asset to maintain the same UV-Boundaries (Its slightly harder as its a circular shape as opposed to a square bounding edge).
In ZBrush I used the Decimation plug-in which allowed me to reduce polycount whilst maintaining the UV Map boundaries of the original high-poly mesh. I did this twice which left me with a high poly, medium poly and low poly iteration of the landscape split in to 55 seperate objects (x3).
This is the mesh as it appears in ZBrush on import, the second shows what happens when the mesh is subdivided (displaying the grid division lines).
Below The second problem I was faced with in exporting of the terrain was retrieving the texture which is produced within Unity by combining a series of splat maps with the high-resolution seamless textures. I wrote a simple script that would run on-play inside Unity which would take a high-resolution screenshot at X x Y dimensions, this meant I could image-capture an unlit 10,000px by 10,000px screenshot of the map from top down orthographic (giving me a perfect match texture). After the process I produced this :
A problem became apparent when I baked the global illumination on to the texture that when the detail that was only visible in the high-res texture was not visible on the lower res version (which is seen below, displaying blotches of black further away of missing detail). I resolved this by rendering the global illumination and ambient occlusion maps from the lowest-resolution iteration of the landscape, this meant any additional details would still look okay as they'd be using the low-res shadow detail.
Below is the three iterations of the mesh combined in to the LODing system within Unity, as you can see it still appears to high poly at this stage and therefore I will need to repeat this process with a much lower-resolution decimation setting to be feasible on a tablet device.

This After repeating the same method again I came up with a new set of LODded landscape pieces, I then imported and set them up in Unity and this is how it appears in the editor.
I then decided the best thing to do for optimisation purposes (and that iOS devices max texture resolution is 1024x024) would be do divide the terrain in to four section of 1024x1024 textures, giving me a higher quality texture render on a tablet device. I baked on global illumination and ambient occlusion inside Cinema 4D (exporting the entire level from Unity to Cinema 4D and combined it in to the GI layer in Photoshop).


Below is a screenshot of the final (for now) iteration of the landscape meshes from low-res to high-res. In-game the LODding will blend a combination of all the models dependent on distance, but for the example in this blog I have enabled each one independently.
Low resolution
Medium resolution
High resolution


