20130418

Final Environment Beauty Shots


Mudbox Workflow

This has been my first test with Mudbox, previously I have only ever used Zbrush for any form of high poly sculpting and the workflow to bring that back down to something workable within a game engine isn't exactly quick or easy in my opinion. Mudbox seems to be great working alongside 3DsMax, I can make changes in the 3DsMax file to do with geometry or UV mapping and send them to Mudbox to update the working model there. I have found this particularly useful later on in the project where I have realised UVs haven't been right when I've exported the normal map (and so I change them in 3DsMax, update in Mudbox and re-export normals).

This module for me has been a lot more about trying to get this workflow in to my head than it has been about making rigid-modular assets. My interpretation of the 'modular' aspect of the project was to produce organic shapes that can be slotted together in an array of different rotations/positions to create new and exciting scenes. 

In the first test below, I created the basic object inside 3DsMax and sent it to Mudbox. I found sculpting using 3DsMax's hotkeys and a mouse to be the most effective way to sculpt. Using the tablet seemed wrong in comparison to Zbrush, the camera control system in Mudbox seems to be flawed when it comes to tablets...

After sculpting up to 3,000,000 polys I then could make a new 'export operation' which would extract normal/AO/displacement maps at whatever resolution I desired, from whatever iteration of the subdivided model I chose (I seem to choose the second iteration or one step up from the original mesh) and the poly counts are perfectly reasonable for the models. 

I then use the AO map as a guide when I'm painting on highlights and more detail in Photoshop.


UDK Modular Asset work

This post is is of two seperate modelling assignments we had, the first was based of a 'space age corridor' and the second was following a UDK/3DsMax/Photoshop guide which showed me how to produce assets of consistent proportions, ratio and quality when doing a bulk of assets. The knowledge I learned was then applied to the alien corridor.
 
The alien scene was composed of a single 1024x1024 texture made up of seamless repeating patterns I created in Photoshop using a combination of offset, layer fx and RGB within levels to achieve the colours. The 9 models that make up the scene are designed to slot together to make a variety of different shapes whilst using the least amount of assets to create an optimised scene within UDK.


Apologies for the quality of the screenshots, they were taken on a Futurework's PC and at the time it appeared to be lit well. Opening them on my iMac with a calibrated monitor showed me the lighting was completely off, I've ramped up the white balance to show more definition of the modular construction.


-----------------------------------------------------------------------------------------------------------

Here is the pre-alien corridor work. The reference image is taken from CGTextures and is royalty free. I then began to split the building up in to modular pieces inside Photoshop. This process involved slightly tweaking perspective through transform/warp/skew and correcting seams/gradients in order to make the texture repeat well.The normal map was produced through CrazyBump after everything had been checked over with the diffuse map on the model.


3D Plinth/Turntable

I created a turntable earlier in the year as part of the learning process, it was so that we could have a generic scene in which to import models to render them out at high quality, and of consistent scale/render size and environment. I personally didn't like the idea of rendering all of my work on top of this plinth, I felt even as a greyscale object it detracted from whatever the art work was that you would be showing. It was also animated so that we could produce 360 degree animated videos/stills of models to showcase the work.

Plinths work in real life as they raise objects up and give them stature, where as digitally trying to show importance of a piece of work doesn't necessarily work in the same way. I personally prefer a simplistic approach to presenting work, allowing the empty space surrounding the model (blank space is rare when looking around the internet!) to let the piece breathe and stand out.

UDK Level - Video


20130417

Level Development

Initial Development

I had original thought to produce a very organic flowing map based on an environment made of sweets and chocolate, this changed soon after this quick concept. It then changed to become a level based upon flowing down a canyon in a raft, but having realised I couldn't apply any puzzles or a great deal of kismet to it I decided to resort to a more traditional FPS style level. I have looked in to developing the landscape around desert terrain and canyon like cliff faces, so I am looking to enclose the level through a combination of these two extremes.


After iterating level concepts in UDK I came up with a level that doesn't look much like the concept above, it had to drastically change from the initial concept to work as a first person exploration game. After coming up with a basic level in UDK that I had reviewed half way through the module, I was told to make it more 'exciting' and give more challenge to the player and to incorporate more Kismet based events. 

Here are a number of screenshots from the initial UDK level, unfortunately I didn't take a great deal of top down photos of the completed map and my packages have all become broken trying to rename/restructure the packages for professionalism. 


I produced a new blockmap in my sketchbook to work from, creating a new level from scratch but now with the existing knowledge of my previous endeavour.


Sketches of gameplay ideas

This sketch shows the idea of the player platform hopping across a steep drop from a cliff edge, the stacks  get smaller to the other side to 'ease' the player in to the concept of platforming in first person. 


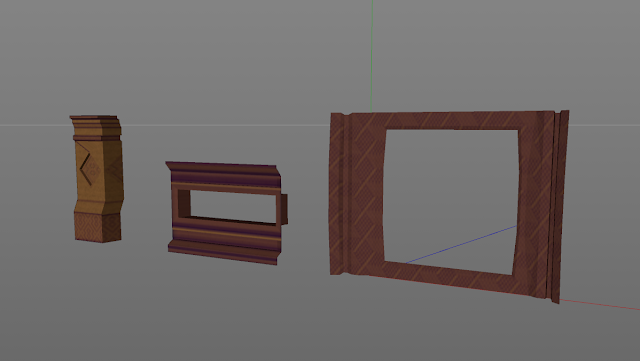
This sketch looks in to a later part of the level which unfortunately I didn't have time to complete, It was where I would tie-in the architecture module assets from XB2002 with the organic landscape that floods the level.


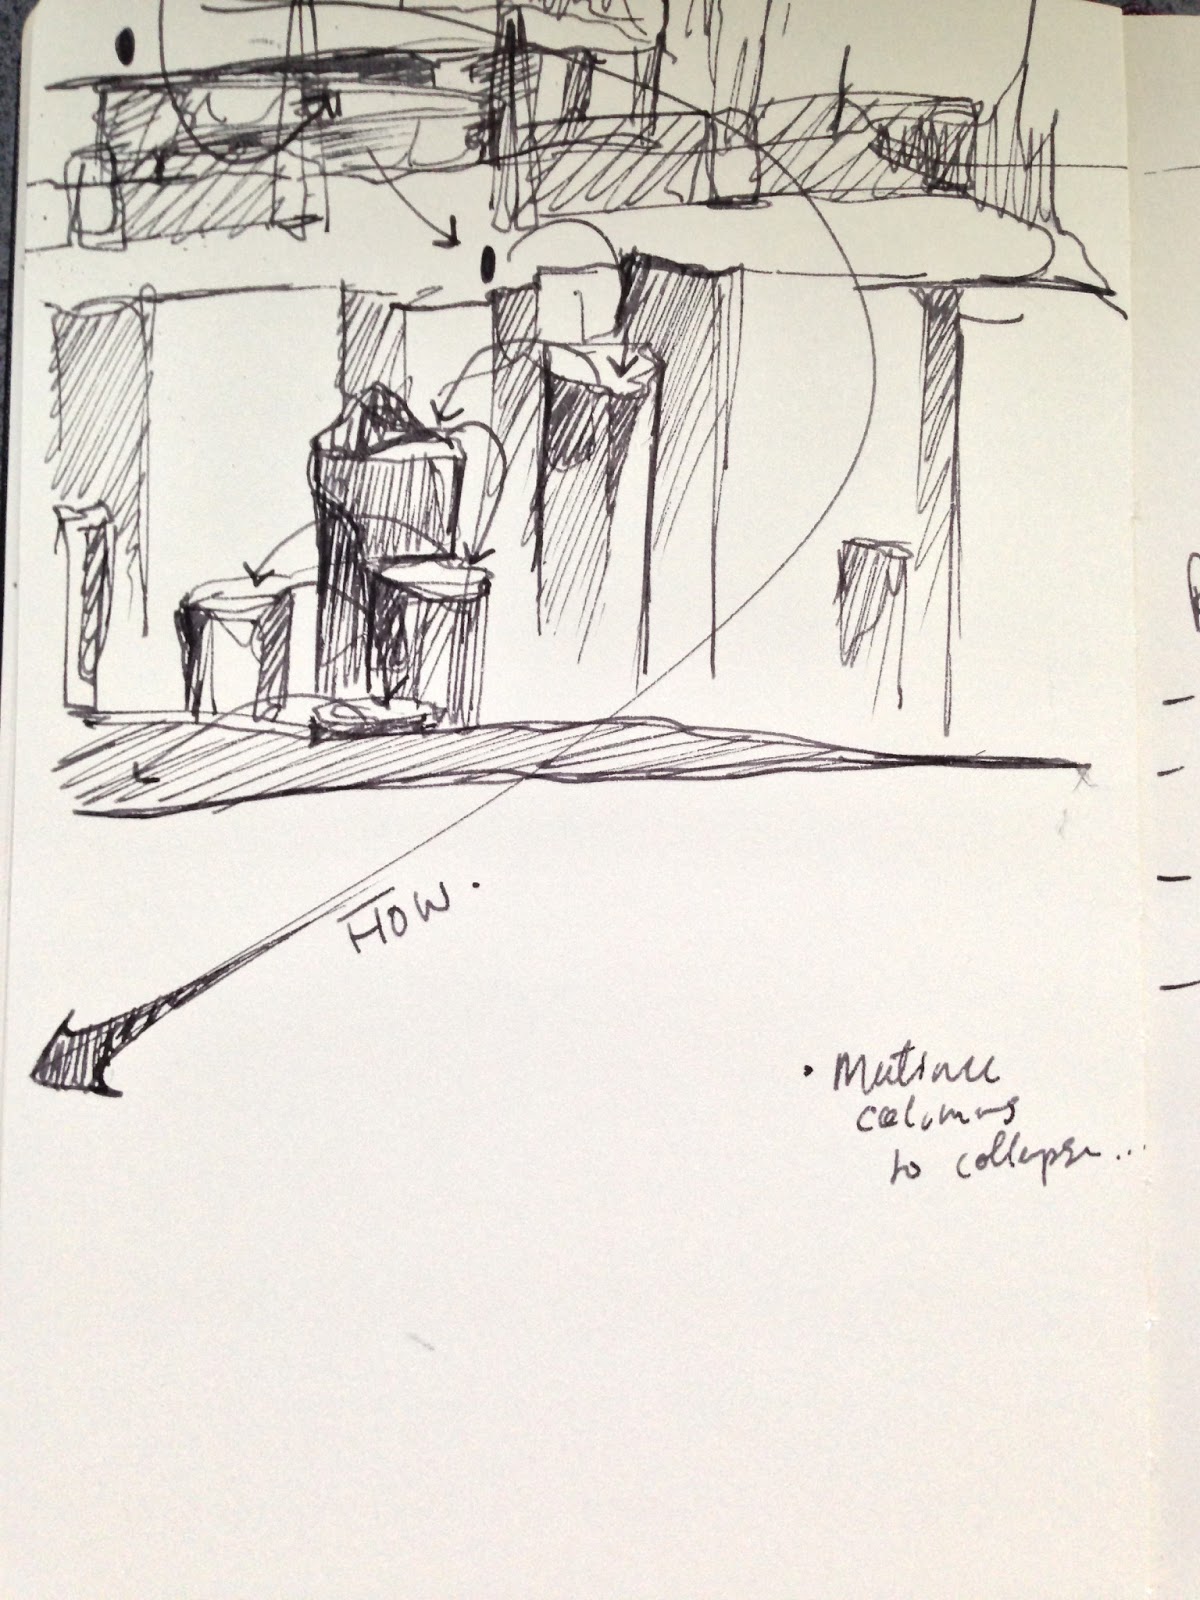
Again, this sketch also relates to a later puzzle which I didn't have time to create. It was an expansion on the simple puzzle I have incorporated already in to the level, but it involves translating the symbol seen on the wall with the 3D cylinder which rotates within the wall.


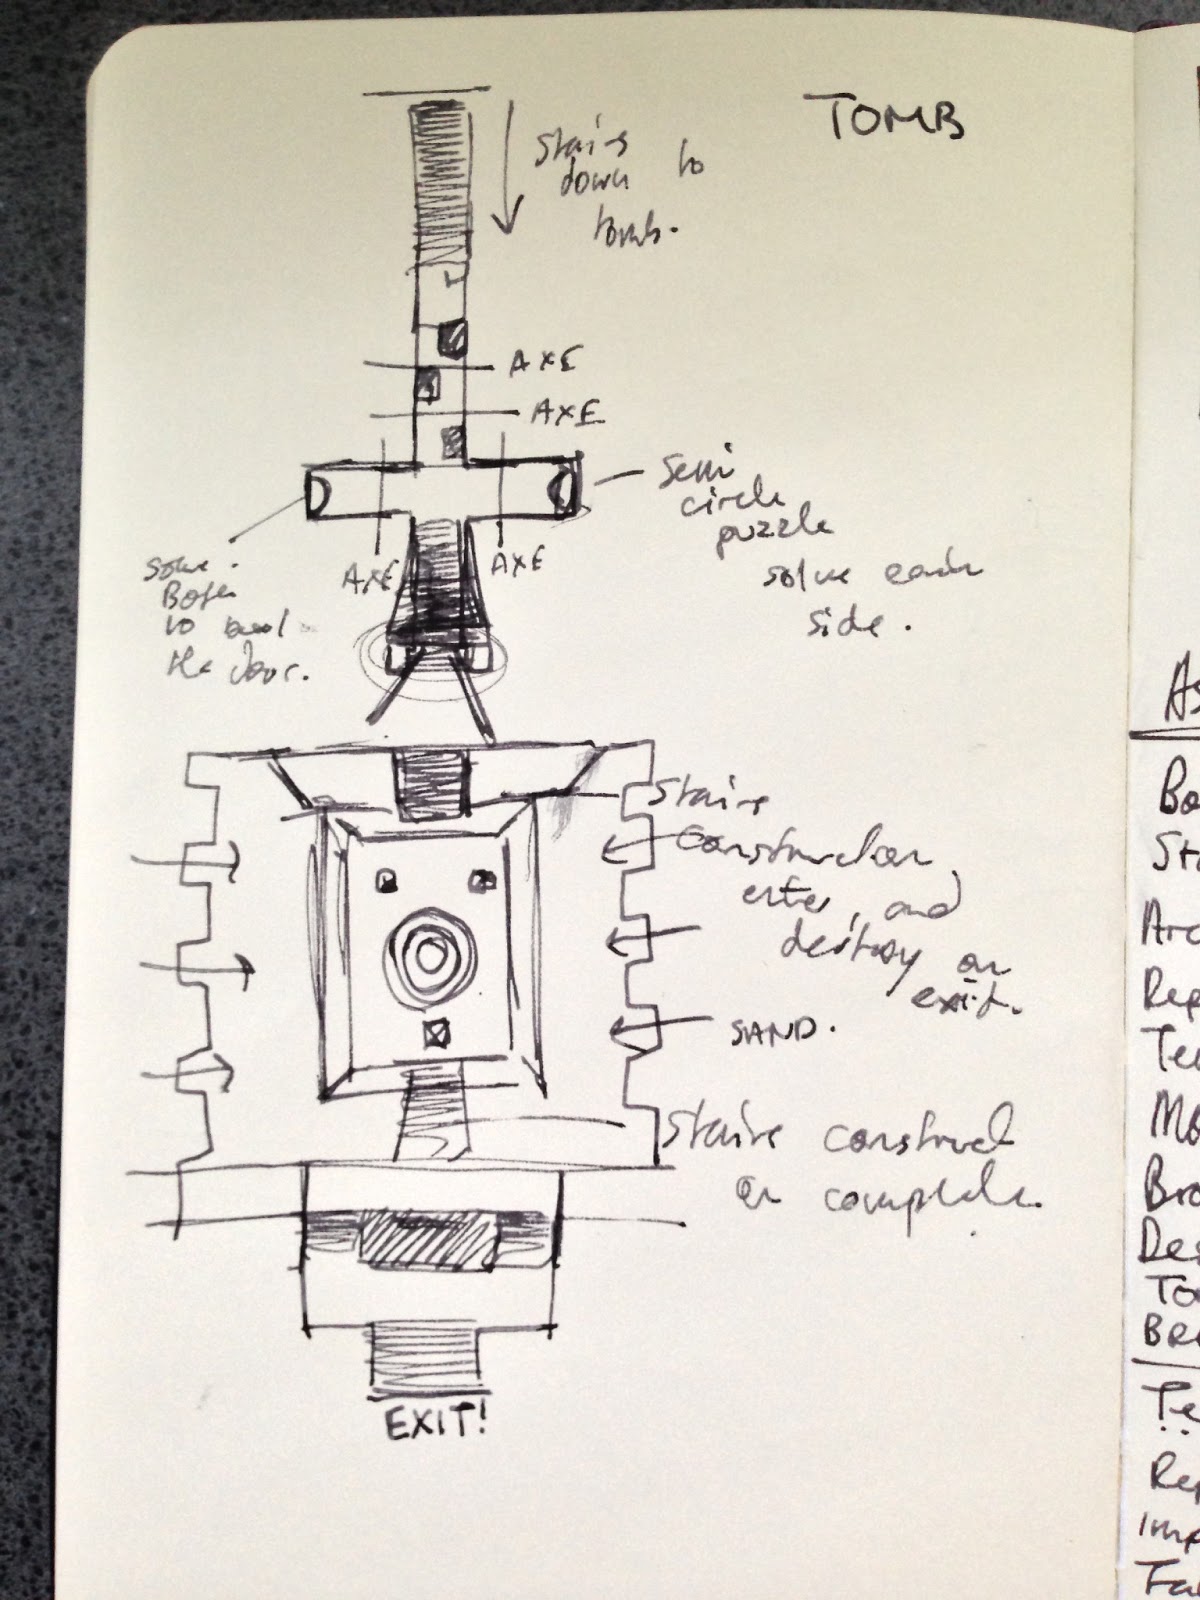
 This section looks at the player entering the tomb section of the level, here the player would put all of what they have learned up to this point to the test. The tomb is a time based event, when triggered the player has X amount of time to complete the series of challenges. They include navigating the narrow corridor, solving two slightly more complex wall/cylinder puzzles (to stop the axes and open the main tomb door) and on entering completing a four-tiered cylindrical puzzle using the adjacent obelisks as clues before the tomb fills with sand (from the exterior wall holes).


 And this is what I created which is just out of reach at the current-end of the level, suggesting what was to come but not giving too much away (other than in this blog post...)


Puzzle Concept, how visually it would be placed and thought process before applying idea in Kismet.


20130416

Futures : Presentation Slides


Self Initiated Project Evaluation

Research

I felt the research for this project could perhaps have been expanded to help me produce a more informed and uniform art style. It seemed at the start I had this vision of a very harsh shaded world which really gave the impression of folded paper, but what I have ended up with is a more smoother 'child like' style lending itself more towards a Wii game instead of something of more artistic merit.

I believe this issue has come through using Unity3D as my game engine and restricting myself to mobile development, these two factors combine to make it much harder to produce high quality/semi-realistic rendering techniques. I have tried later on in the project to rectify this by rendering all of the assets in Cinema 4D using custom made material shaders which can better replicate the look of thick paper on the models (it also helped improve the antialiasing on the models and consistency of the lighting setup).

I felt it was quite a blurred line in terms of polycounts for objects (due to the variety of objects, workflows for polygon reduction and quantity and quality of assets) and also the ordering in which things were produced. Working solo on a project can really test you to see if you can stick to a 'regimented' way of working and many things can affect this process. I found if I had a particularly intensive week and fell behind on my schedule, I'd be doubling up some weeks and on others I'd advance other parts of the project that interested me more at the time messing up the schedule for the later weeks. 

It might have been worth exploring UDK at the start of the project and doing some comparisons between the two game engines to see which would benefit me more visually as the end result for the project was not a game, it was a visual representation of the artwork for the game.


Character

I also believe like the art style, the cat needed a lot more research and development. I think through the project I realised I was much more interested in the design and visual appearance of the environment that surrounded the character than the character itself. I seemed to neglect the work I had to do on the cat until I HAD to do it, perhaps it was past experiences with animation and rigging characters that put me off. I found it quite hard to source any usable footage of cats walking in profile and frontal perspectives, or for that matter any movements (such as jumping, idleness etc)... which is surprising considering the internet is inundated with cat videos.

I felt the character needed to be defined more before I began designing him, I should have built up a back story which had solid foundations from the games core mechanics and then iterated concepts before jumping in with the modelling and texturing process.

I am glad that I did not settle with the first 3D iteration of the cat model, after review it became painfully obvious the cat looked very un-natural, thin and rigid. All these things came from other people reviewing my work, myself and through trying to animate the thing which was like animating 4 cocktail sticks to move like legs.


Scale of project

I'm quite happy that I managed to achieve so much on my own. To produce an entire world including landscape, character, the sky, the atmosphere, the foliage, structures and all the smaller details within the time frame alongside my other modules has proven to myself that I am capable of more than I thought. 

I think at the start I was quite naive in my approach, it is hard at the start of a project to really know how much there will be to do and especially to try and plan an entire years work is no easy task. The problem is everything is based on estimations as this isn't something I have done before, so if one section of the project was underestimated it creates a back log of work which can lead to becoming enthused with the project.

I believe one of the core things I will definitely take through to new projects from this one is having a good workflow. It took me a month or so to really get a good 'flow' for my work method, understanding how I would get from concept to implementation and maintain a consistent quality was a real worry for me at the start.

After much trial and error, and experimenting with software that either sped up or hindered the process I managed to get something that worked for me. Here is a simplified diagram of the process...


Workflow

Asset List > Drawing/Concept > 3D Model > Unity > Block colour >Optimise 3D Model > Texture > iterations L/M > Render Book

It has also made obvious why so many studios have different pipelines for the asset production. Each game is so unique that it requires a tailor made process to produce the assets to a standard that looks right. Not to forget the advances being made in technology year on year, as studios embrace and tailor new softwares to suit their needs. 


Coding

I had hoped I wouldn't have to get involved much with coding as it isn't really a big part of the criteria for this project, but it was unavoidable. Designing assets for a game required me to implement the objects in to the actual game world and view/use them from a players perspective. I created a simple character controller and through learning Mechanim (Unity's new animation module) I hacked a movable character together to be used to test things. I later implemented a few actions the player could do, such as chopping a tree down and mining ore. The final piece of code required was to allow scene switching, this was important to get a feel for the change over between spaces and to see how (and if) it worked.


Book

I think the end result of my project was a little rushed. I hadn't taken in to account render times (which were 30 minutes per object), composing the book together and ultimately getting it printed. I had been quoted 14 working days for an A3 high quality book, by this time I had two weeks remaining on the project and still had to render and compose half the book. I have for this reason fell short on what I hoped I could put inside the book. Some of these things are not necessarily stated in the project plan, for example I wanted to make 3 iterations of each model inside the book (using an appendix to show the low/medium poly models, linked through alphabetical/numerical order). I also wanted to include more renders from Cinema 4D of the landscape and interior scene.


I have purposefully excluded any GUI from the book as I felt it would break the layout and flow of the book, but more importantly I didn't feel the GUI elements stood out enough to warrant its own pages within the book itself. I had hoped I could include the texture maps for all of the 3D elements too, but again it didn't suit what I already had within the book.

Summary

Ultimately it has been a great experience, to be given the opportunity to develop myself at my own pace with a project set by me is something I haven't experienced before. I learned an awful lot from trial and error, and I believe that is one of the most effective ways to learn and remember processes and software specific tasks. What I have come out with is something (when printed) I can take to future interviews and feel confident in the quality and quantity of my work.